Got home a bit early today so took the Cob down to the local tyre place to put it on the 4 wheel laser alignment machine.
I had suspected the front camber adjustments had resulted in an unbalanced toe-out condition - wondered why it seemed to turn in quick! If you move the upper wishbone fulcrum in (reducing shim) to increase camber, this effectively causes the steering arm to move outwards increasing toe-out.
A quick check showed everything to be within a few minutes of where I wanted it camber wise - it was just the excessive toe out on the front to correct, the rears still being spot on.
I had them set the front to 7 minutes toe-in per side - Andy advised running a little more toe along with the increased camber. I was just about to post up the computer output from the laser aligner only to discover I appear to have goosed my scanner???
A bit of roundabout surfing on the way home revealed a marked improvement - despite pushing it quite hard it still felt solid as a rock due to the anti-roll bar and increased front camber. Also after driving down my favourite bump steer route I could not detect any adverse effects. It would be good to take the car on a track as there is no way on earth you can explore the limits of grip on the public highway!
Right...... time to leave the suspension alone now!
Friday 23 April 2010
Finishing the Suspension Adustments
Wednesday 21 April 2010
Fitting the Sidescreens - Part 2


 I was quite pleased that the rubber on the leading edge gave a good seal - even over the step by the screen bow:
Time to peel off the protective film: Repeat for the other side and job done:

 Went for a test drive - nice and draught free -although it wasn't raining so I couldn't spot any leaks.
However......... it is bloody noisy with the hood up. So much so I think you would need earplugs for anything over 45 minutes!
Hmmmmmm..................
Sunday 18 April 2010
Fitting the Sidescreens - Part 1
With the hood fitted it was time to tackle the sidescreens. I had got as far as fitting the "blank" drivers side screen: The next step was to pull down the protective coating so I could mark the various features of the hood on the outside of the screen:
 Then it was out with the trusty jigsaw - to cut Lexan neatly you need a variable speed jigsaw a turn it right down to around 500 strokes per minute and use a special plastics blade - this will give you a nice clean cut with no melting of the edge:
 And Voila!
 The next job was to position the catch and cut the hole out. The holes is not round - more like an oval with two straight sides. Time for a new Dremel attachment - a mini router:
 Job Done. I'll also need this to mill down the leading edge of the sidescreens. I have left a bigger gap between the sidescreen and windscreen frame than normal as I am going to fit a rubber seal. However the smaller rubber seals won't fit the 5mm thick Lexan. I'll need to reduce the thickness of the leading edge down to around 3mm. Then I can fit the leading edge and lower edge rubber seals and it should be job done!
Thursday 15 April 2010
Hood Fitted!
Being under strict instructions to free up the dining room table it was time to crack on. I finished glueing and trimming the returns and had to come up with a means of sealing the hood against the body???


Tuesday 13 April 2010
Not Fitting the Hood - Boat Stuff Instead
Whilst I'm waiting for a replacement Hood Frame Pivot from GD I took the opportunity to get some stuff done on the boat.


 The battery is out and is currently connected to my Optimate - the plan is to put it in the water on Saturday and see if it starts - the boat not the battery! - assuming it all gets put back together in time.
 Sunday 11 April 2010
Fitting the Hood - Part 6
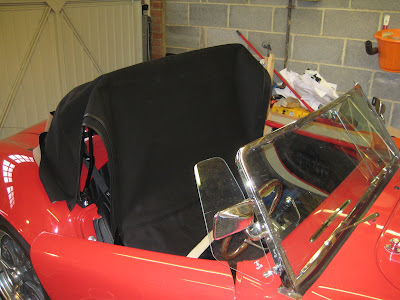
Time to see if it fits:


Saturday 10 April 2010
Fitting the Hood - Part 5

So this leaves the hood bows at the front to do. Here you need to trim the hood material to clear the fixing lugs on the hood bows like this:
The hood material is bonded to the inner face of the front edge and the underside of the top face. I sprayed both the hood material and the hood bows for a good bond:


 So time to leave everything to cure a bit more overnight before a trial fit tomorrow to fit the hood bow catches and start to figure out the sidescreens:
Tuesday 6 April 2010
Back on The Road
Having just recieved my new tax disc I decided to take an extra days Easter holiday to get the car back on the road. I had become distracted with fitting the hood and with not a lot of spare time I never finished off the odd jobs that were outstanding.

 If the forecast is OK tomorrow morning then I may well go to work in it and get the tracking checked at lunchtime - the OSF will be toeing out a little I suspect after the camber alterations I made.
Friday 2 April 2010
Fitting the Hood - Part 4
Today's the day..... Glue Day!!

 A good measure of the correct tension is when the window surround trim is within 5mm of the GRP section at the centre of the car:
 You can then work the hood material round to each door shut and check everything is symmetrical. In my case it was, give or take a couple of mill, so I sprayed the remainder of the GRP, tensioned and bonded the rest of the hood. For ease as I was working on my own I split each of the remaining sections into 2 more manageable chunks:
The above photo was half way round the one side. The following photo is after all the back section has been glued. You will see a few creases developing on the rear quarters (partly due to the tape on the screen slipping!) - but these will pull out once the final tension is applied to the front.  I had some dinner to let the glue go off a bit before tackling the front - doesn't take long as the garage was getting quite warm by now!!
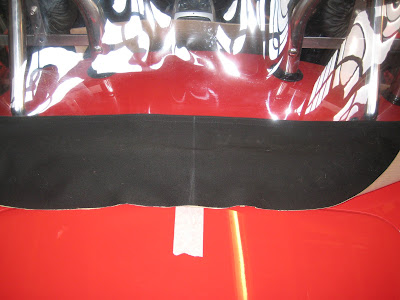
I removed the tape from the front and re-tensioned the hood to get all the creases out - this was easy as the hood was quite soft by now. I taped the hood back down to the screen and marked the taped where it passed over the top edge of the hood bow - this would let me know how far to pull for the correct tension when gluing.
I then removed the tape from one half of the screen and sprayed the evostick on the front face of the hood bow - don't glue the top face as this is not the natural line of the hood: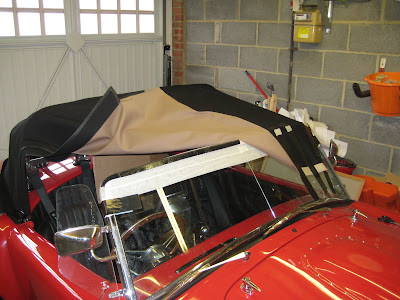
And then simply repeat for the other side. After which I went mad with the Duck Tape just to take the pressure off the freshly bonded glue joint: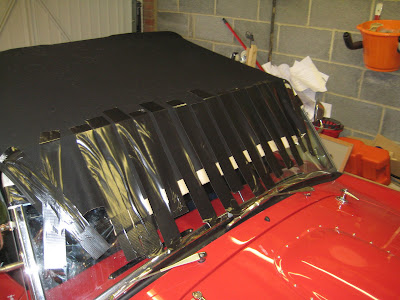
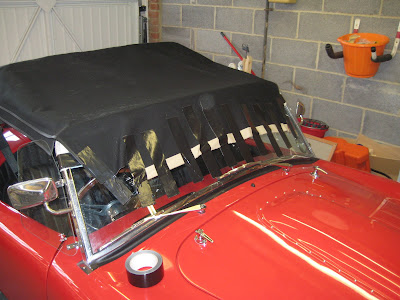
And there we have it:
I am quite pleased with the shape and lines of the hood and the absence of wrinkles! The hood ended up about 5mm off centre over the screen but I didn't think it was worth un-gluing - particulalry not just to end up with it 5mm out the other way!
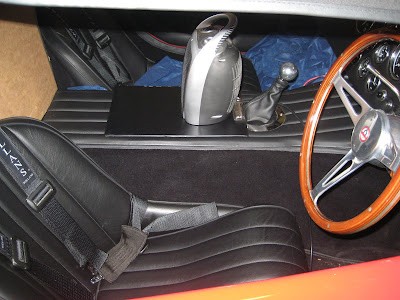
It also looks quite good from the inside: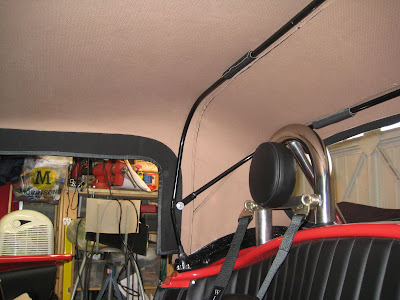
 Top Tip for fitting the Hood....... do it in the middle of an August heatwave - not when there's frost outside - it'll save you a fortune on your electricity bill!