
Not a lot of free time at the moment - hence onto Part 3 already and the hood is nowhere near being fitted!
I managed to paint the inside faces of the GRP moulding the other night so having got some M5 stainless dome nuts I fixed the pivot brackets to the GRP moulding (bedded on a layer of Sikaflex to allow for surface undulations in the GRP):  I also got some M8 dome nuts so I finished off the undersides of the moulding fixings:
 Yet another package to open was some m5 thumbscrews for fixing the GRP moulding to the body:
 Just the job and small enough to clear the angled flange around the back over the boot yet big enough to get hold of easily with your fingers:
  So masking tape was applied to the bottom of the moulding and it was bolted into place ready for fitting the hood. The hoops and pivots where also fitted:
  Next I masked off the top of the windscreen and fitted the front hood bows holding them in place with masking tape around the lower end:
  I also marked up the sides of the bows in 10mm increments from the bottom edge of the bow - this will help to centralise the hood over the screen:
  Rapidly approaching the time for glueing!! But first I need to get a few heaters to get the garage nice and warm - if not hot - so the hood will be nice and supple. Problem is the temperature is dropping here and snow is forecast for the next couple of days!
Better get some BIG heaters then!
Planning on Friday being the day for glueing.
Monday, 29 March 2010
Fitting the Hood - Part 3
Tuesday, 23 March 2010
Fitting the Hood - Part 2
The next step was to trim the GRP Mouldings down to match the edge of the door opening:

 I may yet still need to trim the vertical flange back - depends on how the sidescreen closes. The folding hood frames have a pivot and the bottom which is supposed to be bolted to the GRP Moulding:
 The fixing is a single M5 countersunk bolt. I didn't think this would be strong enough to stand up to a few years of abuse so I decided to modify things slightly. I found that the pivot would fit snugly inside a wardrobe rail support bracket:
 This was positioned on the GRP moulding and two countersunk holes drilled:
 This puts the pivot about 4-5mm further back than the position recommended by GD because I allowed a bit of edge distance to the outside hole:
 The final fitting will have shorter stainless bolts finished off with a dome nut. I will also "butter" the underside of the bracket with sikaflex to help take up any slight surface variations. I think I'll also drill the socket and fit a self tapper just to hold the pivot in place (or possibly araldite it into place as there is no need to remove the pivot form the Moulding) although I doubt it will go anywhere due to the tension in the hood. Now it was time to re-fit the mouldings and fit the hood frames:
  As you can see they fold up quite neatly. The reason behind fitting the folding hood is the intention to go touring. This way you can carry the hood folded down on the car giving some precious extra boot space. Plus if it looks like rain you can fit the hood before leaving and it will only take a very short time to fit should it start to rain.
Temptation got the better of me so I draped the hood over the frames and screen to see what it would like:
 I think it makes the car look more "vintage".
 Hmmmmmm........cosy.
 I think it makes the car look more "vintage".
 Hmmmmmm........cosy.
 The last job for today was to file and sand the mouldings to get rid of any sharp edges and then prime them ready for painting on the inside. I did think of trimming them but decided it was going to be too awkward.
Monday, 22 March 2010
Fitting the Hood - Part 1
Went down to GD to pick up my hood bit and pieces on Saturday Morning. But as I had to work Saturday Night / Sunday Morning I never got a chance to start!
The first task is to take the GRP moulding and file the moulding pips down on the bottom - these mark the fixing hole centres. Mark the centres - check for symmetry then drill 6mm holes for the M5 bolts - (leaves a little tolerance). Stick some masking tape to the underside of the moulding (to prevent marking the body) and offer up to body lining it up with the doors and taping into position:

You can then drill through into the body with the 6mm drill. Remove the moulding and open the holes up in the body with a 8mm drill for the fixing inserts. You then end up with 8 nice holes in body! 
Put the stainless inserts in (after a bit of a polish) and tighten up. The inserts are a top hat m8 bolt with an m5 tapping down the middle. They are fixed in place with a plain nut, spring washer and body washer:


I'm going to get some acorn nuts to finish them off underneath to prevent any water getting into the boot when the hood is not on.
The next job is to cut the GRP moulding in half and then trim 25mm of each end (same as 50mm out of the middle) with the ends cut back at 45 degrees. This is to allow the hood to fold up for storage.
I then bolted the two mouldings into place temporarily with some M5 bolts (I have ordered some M5 thumbscrews for a proper job) stood back and admired my handiwork.
Next step will be the folding hood hoops tomorrow hopefully.
Tuesday, 9 March 2010
Uh.Oh...... Another Distraction!
Well... my mate Dave has gone and bought hinslef a ski boat - a 1992 Mastercraft. It has an Indmar Ford V8 - looks like it's based on a 351 Cleveland. It needs a bit of TLC but has the potential to be a very nice boat indeed. Engine needs a little work mainly the ancillaries, hoses and wiring plus the exhaust / muffler is shot and needs repiars - but it shouldn't take much to get it in the water and running. Then we can see what else needs doing.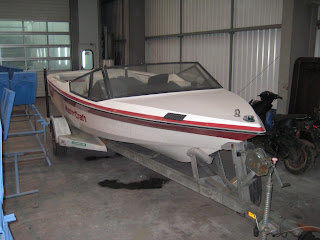


Watch this space................
Sunday, 7 March 2010
Nearly didn't Make it Back from the Alps......
 ...... now that's what you call "whiteout".
Normal service will be resumed shortly.
Subscribe to:
Posts (Atom)


